The five-minute version
If you only do five things, do these. Each one links to the full detail below.
Signing in for the first time
When you open the app on a new tablet, it shows a 6-digit activation code. You finish sign-in from your phone or computer — no typing passwords on the tablet.
- 1On your phone or computer, go to the web address shown on the tablet screen.
- 2Type in the 6-digit code displayed on the tablet.
- 3Sign in with your Clover account when prompted.
- 4The tablet takes over from there. You'll see “Signed in. Setting up your display…” and then your order screen.
If the code stops working
- Codes expire after a few minutes. If you see “This code has expired,” tap Get a new code on the tablet and start over.
- If the tablet says “Internet is not connected,” check its Wi-Fi before trying again.
The three screen modes
Your display can run in one of three modes. Switch between them from the menu in the top corner of the order screen.
| Setting | What it does |
|---|---|
| KDS View | The standard kitchen display. Shows full order tickets with items and modifiers for your cooks. |
| Takeout View | A layout tuned for takeout and to-go orders, so your expo or counter staff can work a separate queue. |
| Customer View | A customer-facing screen — typically a TV in the lobby — showing which orders are being prepared and which are ready for pickup. |
General settings
Sound, payment indicators, and the master on/off switch for this display.
| Setting | What it does |
|---|---|
| Enable KDS | Turns the kitchen display on or off for this device. Leave this on for any screen you want receiving orders. |
| Show modifier groups along with items | Shows modifiers underneath each item — things like “no onions” or “extra cheese.” Most kitchens leave this on. |
| New order sound | Plays a sound whenever a new order lands. Turn this off if you want a silent screen. |
| Ringtone | Choose which sound plays for new orders. Pick something that carries over kitchen noise. |
| Payment Indication | The order type badge turns green once the order has been paid, so staff can see payment status at a glance. |
Display settings
How orders look on screen and how long they stay there. These are the settings most worth tuning to your kitchen.
| Setting | What it does |
|---|---|
| Maximum orders to display on screen | How many order tickets show at once in KDS View — 2, 4, or 8. Fewer orders means bigger, easier-to-read tickets. |
| Take out view maximum orders | Same idea, but for Takeout View — 2, 4, or 8. |
| Font size | Small, Medium, Large, X-Large, or XX-Large. Set this based on how far your team stands from the screen. Larger fonts mean fewer items visible per ticket. |
| Swipe orders | When on, staff swipe left and right to move through orders. When off, they use the Previous and Next buttons instead — handy if your screen gets bumped or greasy. |
| Show status bar | Hides the Android bar across the top of the tablet, giving you more room for the order itself. |
| Order late threshold | How long an order can sit before it turns red and counts as late. Set this to match your normal ticket time. |
| Display orders upon payment | When on, orders only appear on the KDS after payment is taken. Useful for counter-service and quick-service setups. |
| Display only printed items | When on, only items that were sent to the kitchen printer show on this screen. |
| Show Consolidated View | Summarizes all open items grouped by category, instead of showing them order by order. Good for prep stations working in batches. |
| Maximum order age | How long an order stays visible on screen before it drops off. |
| Maximum order limit | Caps how many orders the display holds at once — 25, 50, 75, or 100. |
| Colors for order types | Assign a color to each order type — for example To-Go in purple, Dine-In in blue. This is one of the fastest ways to help staff read the screen at a glance. |
Two settings worth getting right
- Font size — walk to where your team actually stands and read the screen from there. If you have to squint, go up a size and drop the orders-on-screen count.
- Order late threshold — set it to your normal ticket time, not your best one. If everything is red, nothing is red.
Data & sync
This section controls how multiple screens work together.
| Setting | What it does |
|---|---|
| Master Control — ON | This monitor acts as an Expo screen. It oversees and updates orders across your other displays. |
| Master Control — OFF | This monitor works on its own. Orders are updated individually on this screen only. |
Choosing your setup
- One screen only — leave Master Control off.
- Multiple stations plus an expo window — turn Master Control on for the expo screen, leave it off on the individual station screens.
- Terms & Conditions, Privacy Policy, and Logout also live in this section.
Filters — choosing what each station sees
Filters let each tablet show only what that station cares about. This is what keeps the bar from seeing fryer tickets and the grill from seeing drinks.
| Setting | What it does |
|---|---|
| Category labels visible on this station | Choose which menu categories appear in Consolidated View on this screen. |
| Item labels visible on this station | Choose which item labels — such as Kitchen or Bar — show on this particular tablet or screen. |
| Order types visible on this station | Choose which order types appear here, such as Dine-In or To-Go. Set this per tablet. |
| Hide paid order types | When one guest pays, Clover creates a new order and marks the item as paid. Turning this on hides those paid orders — most useful for full-service restaurants. |
Customer view settings
These two settings only apply to a screen running in Customer View — usually a TV in your lobby or pickup area.
| Setting | What it does |
|---|---|
| In-progress orders title | The heading shown above orders still being made. Edit this to whatever wording fits your restaurant — for example “Being Prepared” or “Cooking Now.” |
| Completed orders title | The heading shown above orders ready for pickup — for example “Ready” or “Come On Up.” |
On-screen alerts to watch for
The display uses a few visual cues to flag orders that need attention.
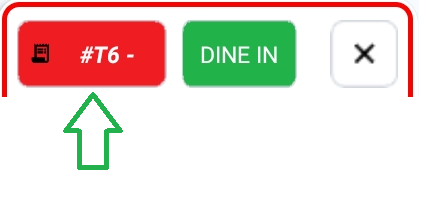
Refired items
When an item is refired, the table number or employee name turns red.
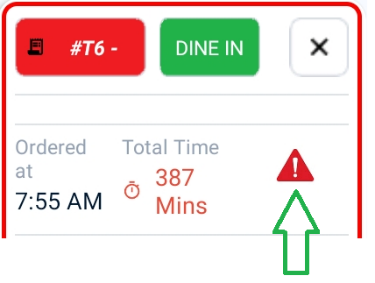
Combined orders
When orders have been combined, a red triangle appears on the ticket.
New station checklist
Working through these in order gets a new screen production-ready in a few minutes.
- 1Sign in using the code on the tablet screen.
- 2Confirm Enable KDS is on and pick a new order sound your team can hear.
- 3Set the font size and maximum orders on screen for where the screen is mounted.
- 4Set the order late threshold to match your normal ticket times.
- 5Assign colors to your order types.
- 6Under Filters, choose which categories, item labels, and order types this station should see.
- 7If you run multiple screens, set Master Control on your expo screen and leave it off elsewhere.
- 8If this is a lobby TV, switch it to Customer View and set your two titles.
Troubleshooting
The issues we get asked about most, and what to check first.
| Problem | What to do |
|---|---|
| “Internet is not connected” | Check the tablet’s Wi-Fi or ethernet connection, then reload. |
| Activation code expired | Tap Get a new code on the tablet and sign in again from your phone or computer. |
| Orders aren’t updating across screens | Confirm Master Control is on for your expo screen. If every screen has it off, each one updates on its own. |
| An order isn’t showing on a station | Check that station’s Filters. Its category, item label, or order type may be switched off. |
| Orders disappear too quickly | Increase Maximum order age, or raise Maximum order limit if you run high volume. |
| Tickets are hard to read across the kitchen | Increase Font size and lower Maximum orders to display on screen. |
Still stuck? Reach us on live chat inside the app, email support@kitchenbot.io, or call 704-287-4009.